
The Devore Electronics Softub board provides a simple way for an Arduino to control board functions and monitor water temperature. The J10 connector has two active-low control inputs and a DHT22-format temperature data signal. This guide describes the connector by its pin numbers.
Work only with the board disconnected from power while wiring. Check your Arduino’s input voltage limits before connecting the signals.
J10 connector pinout
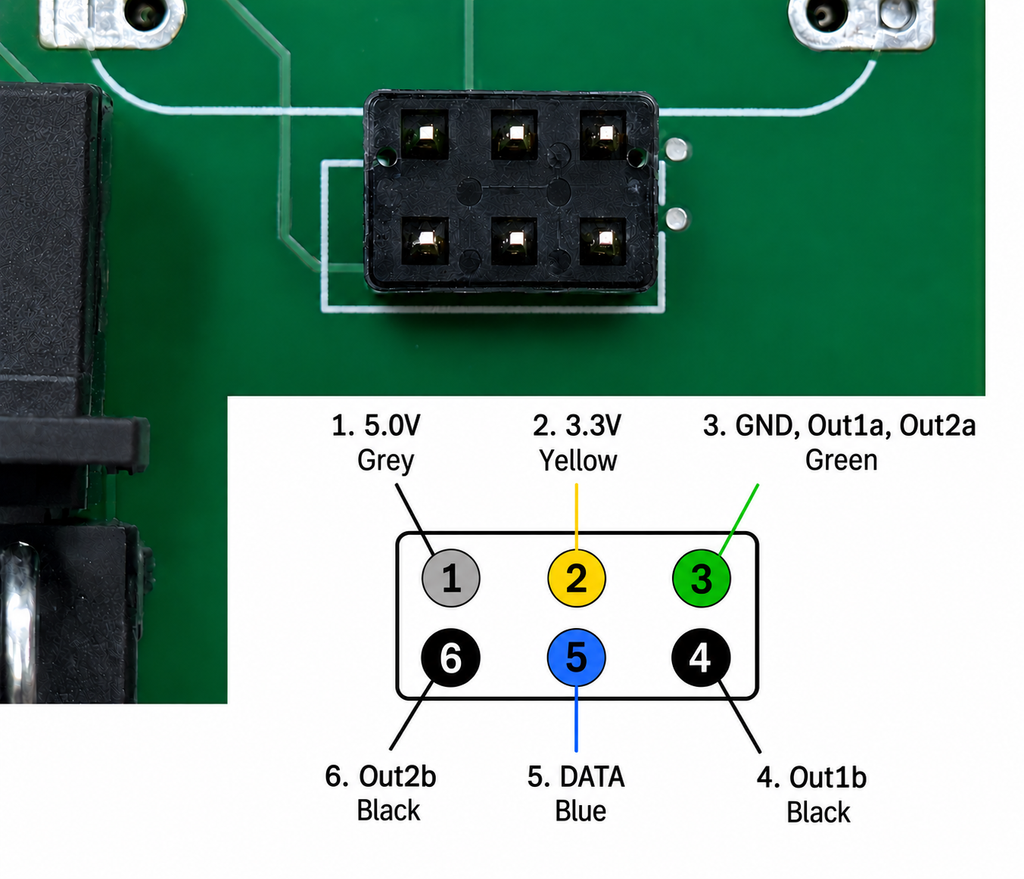
The diagram below shows the location and function of pins 1–6 on the board.
Power and signal levels
- Pin 1 provides 5.0 V from the Softub board. It is the pull-up supply for pin 4. It is a regulated 5v. Use it to power the Arduino.
- Pin 2 is the voltage input for the level translator. Supply voltage to pin 2 from the Arduino or Wi-Fi board: use 3.3 V for 3.3 V logic or 5 V for 5 V logic. Pin 2 does not provide 3.3 V from the Softub board.
- Pin 3 is ground. Connect it to Arduino GND so the Arduino and Softub board share a common reference.
- Pin 4 is an active-low input to the Softub board. It has a 10K pull-up to pin 1’s 5.0 V supply, so no additional pull-up is needed. Pull J10 pin 4 LOW to activate it; leave it high impedance to release it. The Softub board’s pull-up supplies the HIGH level. It corresponds to Out1 in the Shelly documentation.
- Pin 5 carries temperature data in DHT22 format.
- Pin 6 is an active-low input to the Softub board. Its pull-up and level-translator voltage come from J10 pin 2: supply 3.3 V for 3.3 V logic or 5 V for 5 V logic. It has a 10K pull-up, so no additional pull-up is needed. Pull J10 pin 6 LOW to activate it; leave it high impedance to release it. Pin 6 is available on board version 1.26 or later. It corresponds to Out2 in the Shelly documentation.
Connect the Arduino
With power disconnected, connect J10 pin 3 to Arduino GND. Connect J10 pin 4 to Arduino digital pin 4 and J10 pin 6 to Arduino digital pin 7. Configure each control pin to pull its line LOW when active and switch to high impedance when inactive; never drive the lines HIGH. J10 pin 4 is pulled up to 5 V, so pin 4 must be 5 V tolerant or connected through a suitable open-drain/level-shifting interface. Supply J10 pin 2 from the Arduino’s 3.3 V output for 3.3 V logic or 5 V output for 5 V logic. Connect J10 pin 5 to Arduino digital pin 8 for the DHT22 data signal.
Control the board inputs
Use Arduino digital pin 4 to control J10 pin 4 and Arduino digital pin 7 to control J10 pin 6. Both board inputs are active LOW: drive a pin LOW to activate the input, and switch the Arduino pin to high impedance (INPUT, with its internal pull-up disabled) to release it. Do not drive either line HIGH; the Softub board’s pull-up provides the HIGH level. Match the J10 pin 2 voltage to the Arduino’s logic level.
const int j10Pin4Control = 4; // Arduino pin 4 drives J10 pin 4
const int j10Pin6Control = 7; // Arduino pin 7 drives J10 pin 6

void releaseControls() {
  // High impedance lets the board's pull-ups return the inputs HIGH.
  pinMode(j10Pin4Control, INPUT);
  pinMode(j10Pin6Control, INPUT);
  digitalWrite(j10Pin4Control, LOW); // Keep internal pull-ups disabled.
  digitalWrite(j10Pin6Control, LOW);
}

void activatePin4() {
  digitalWrite(j10Pin4Control, LOW); // Set output latch LOW before driving.
  pinMode(j10Pin4Control, OUTPUT);
}

void activatePin6() {
  digitalWrite(j10Pin6Control, LOW);
  pinMode(j10Pin6Control, OUTPUT);
}

void setup() {
  releaseControls(); // Start with both board inputs inactive.
}

void loop() {
  // Call activatePin4() or activatePin6() to pull an input LOW.
  // Call releaseControls() to let the board pull the inputs HIGH.
}
Read temperature from J10 pin 5
J10 pin 5 carries temperature data in DHT22 format. Install a DHT-compatible Arduino library, set the sensor type to DHT22, and connect J10 pin 5 to Arduino digital pin 8.
#include <DHT.h>

const int j10DataPin = 8; // Arduino pin 8 connects to J10 pin 5
DHT dht(j10DataPin, DHT22);

void setup() {
  Serial.begin(115200);
  dht.begin();
}

void loop() {
  float temperatureC = dht.readTemperature();

  if (isnan(temperatureC)) {
    Serial.println("Could not read the Softub temperature");
  } else {
    Serial.print("Softub temperature: ");
    Serial.print(temperatureC);
    Serial.println(" °C");
  }

  delay(2000);
}
The board reports temperature in 0.1 °C increments. A Fahrenheit conversion may differ slightly from the control-panel display because of rounding.